A few years ago, Siemens explored ways in which the new capabilities in CAD solutions can enhance design teams’ productivity. They noted that automating interactions with the CAD user interface using custom scripting and macros and enabling designers and engineers to customize the user interface help drive productivity gains. This article highlights one of the ways you can achieve the latter: customizing CAD shortcut menus.
Customizing menus and the user interface lets you control how you interact with CAD software, changing its look and feel. You can add frequently used commands and have more control over the design process. This article focuses on customizing one type of CAD menu: the context menu. It explores what shortcut menus are, their role in CAD, how to customize them, best practices for customization, and how to standardize the customization process. Let’s get started.
Table of Contents
Understanding Right Click and Shortcut Menus in CAD
The CAD shortcut menu is also known as the context menu, a right-click contextual menu, or a right-click menu. CAD software displays this menu whenever you click the right mouse button while working on a 2D drawing or 3D model. This menu contains options or commands that are contextual, meaning they depend on the cursor’s position and location when you click the right mouse button.
The context menu will display relevant commands that reflect the context within which you right-clicked. For instance, using the right mouse button to click on an object will display different commands to an instance when you click on a blank area. The former action will display some shortcuts specific to that selected object. The latter action, on the other hand, will display broader shortcuts that relate to the entire document.
It is worth noting that some CAD software products have unique implementations of the right mouse button, with Solid Edge being a good case in point. While the right-click button on Solid Edge allows you to access various commands and features that are not available elsewhere on the toolbars, ribbon, or menu, it has some nuances.
For instance, right-clicking an empty space serves the same function as clicking the Accept or the Finish buttons when they are displayed on the Command bar. But if you hold the button down, Solid Edge displays the radial menu.
The right-click also behaves differently when you press it while giving the mouse a simple yank in a particular direction: it starts the command that is in that section of the radial menu without displaying the menu altogether. There’s a lot more you can do with this button, and Siemens has two blog posts (part 1 and part 2) on the button’s entire gamut of functionalities.
Role of CAD Shortcut Menus
In simple terms, a CAD shortcut menu offers numerous shortcuts that provide convenient access to various tools. It, therefore, helps you access commands much faster than if you had followed the regular path. This lets you complete tasks more quickly and easily.
Alternatively, you can use keyboard shortcuts. And at Scan2CAD, we have compiled PDF cheat sheets containing keyboard shortcuts for the various CAD software as listed below:
- AutoCAD’s essential list of commands
- BricsCAD keyboard shortcuts
- SolidWorks keyboard shortcuts
- Vectorworks keyboard shortcuts
- Revit keyboard shortcuts
- DraftSight keyboard shortcuts
- Onshape keyboard shortcuts
- ArchiCAD keyboard shortcuts
- LibreCAD keyboard shortcuts
- Scan2CAD keyboard shortcuts
Customization Options in Popular CAD Software
Most CAD software products offer even more convenience on top of the perks of accessing shortcuts by letting you customize shortcut or context menus. But the use of the term ‘most’ shows that not all CAD tools support this level of customization. Onshape, DraftSight, FreeCAD, and ArchiCAD, for instance, do not.
If supported, CAD software allows you to do the following:
- Add or remove commands to the CAD shortcut menu
- Show or hide commands
- Change the name and description/caption of the command or menu item
- Create a new shortcut menu
- Change the order commands or items in a right-click menu
- Reset the right-click menu to the default settings
How to Customize Right-Click Menus in Popular CAD Software
AutoCAD
AutoCAD lets you customize its CAD shortcut menus in different ways, including adding a command to the menu and changing the caption of a menu item in the shortcut menu. You can also create an object shortcut menu or a command shortcut menu.
This article will cover the procedure for adding commands to the AutoCAD shortcut menus. Autodesk has detailed the other procedures on its website. It’s worth mentioning that these procedures apply to various AutoCAD products, including AutoCAD, AutoCAD Architecture, AutoCAD Electrical, AutoCAD Mechanical, AutoCAD MEP, AutoCAD Plant 3D, AutoCAD Map 3D, AutoCAD Raster Design, and Civil 3D.
Here are steps to follow when you want to add commands to the CAD shortcut menu in AutoCAD:
- Click the Manage tab
- Within the Customization ribbon panel, click the User Interface icon, which opens the Customize User Interface (CUI) editor
- In the Customize tab, under the Customizations in All Files section of the editor, you will find a tree. Click the (+) icon of the Shortcut Menus branch to expand it. This will open the various shortcut menus that you will ordinarily find in AutoCAD.
- To add a command to a CAD shortcut menu, click the (+) icon alongside the name of that particular menu to expand it
- Move your cursor to the Command List section of the editor and search for the command you want to add to the CAD shortcut menu
- Drag and drop the command to the menu
- Click Apply and then OK.
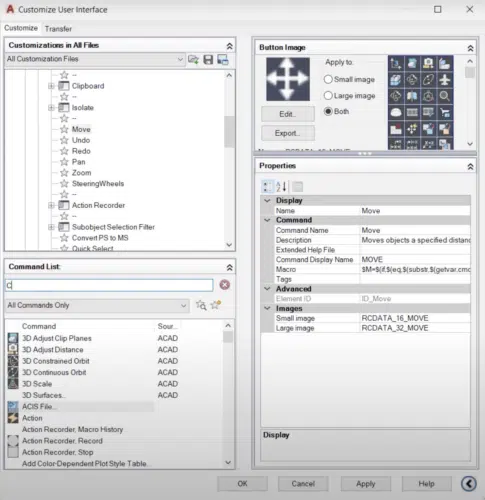
Customize User Interface (CUI) Editor in AutoCAD
SolidWorks
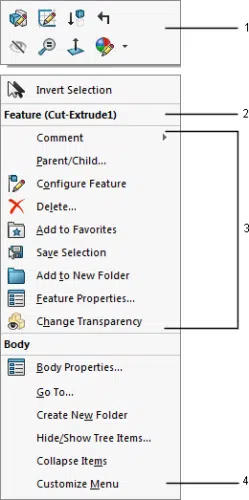
CAD Shortcut Menu in SolidWorks (source)
SolidWorks displays shortcut menus when you press the right mouse button while the cursor is hovering over the window borders, the FeatureManager design tree, or the model geometry. Each CAD shortcut menu in SolidWorks often includes:
- A context toolbar containing frequently used commands (represented by 1 in the image)
- Headings that show the name of the section of the menu (2)
- Groups of related menu items (3)
- The option to customize the menu (4)
By default, SolidWorks displays the short versions of the CAD shortcut menus. To display the extended version, click the downward-facing arrow. Here is the step-by-step procedure detailing how to customize items in a shortcut menu in SolidWorks; this procedure lets you hide or show items on the context menu:
- Hover the cursor over a section whose shortcut menu you want to customize and press the right mouse button.
- Click the downward-facing arrow (
 ) to expand the CAD shortcut menu.
 - Select the Customize Menu option.
- Check or select the appropriate check boxes to hide or show menu items, respectively. (Selected items will appear on the short version of the CAD shortcut menu, while the hidden items will appear on the extended version.)
- Press the Enter button or click outside the menu to enforce the changes.
To customize the entire shortcut menu, follow this procedure:
- Click Tools and then select Customize. Alternatively, hover the cursor over the window border, right-click, and select Customize.
- Select the menu you want to customize and then choose the command to add, remove, or rename. You can also select options such as the menu position.
- Select Rename, Remove, or Reset All
- Click OK to complete the customization
Inventor
The CAD shortcut menus in Inventor are contextual and dynamic. The software will display different options in the menu depending on the objects you have selected, the environment (whether 2D or 3D), and the position of the cursor when you click the right mouse button. Right-clicking in a blank area shows a different menu than right-clicking after selecting an object.
Inventor takes it a step further by giving you the freedom to choose which options appear in the right-click menus. Here are the steps to follow whenever you want to customize the CAD shortcut menus in Inventor:
- Click the Tools ribbon tab
- Select the Customize option within the Options ribbon panel. This step opens the Customize dialog box.
- Click on the Marking Menu tab within the Customize dialog box.
- Choose the Environment (e.g., Part, 2D Sketch, 3D Print, 3D Sketch, Analysis, Assembly, and so on) and Sub-Environment from the respective drop-down menus.
- Select the menu option you want to replace and choose the command with which you want to replace it.
- Click Apply, then Close to exit
Creo
Creo lets you customize CAD shortcut menus to not only create your own collection of commands but also add frequently used commands. Here is the step-by-step guide on how to customize the context menu from the graphics window:
- Hover the cursor in the graphics window and press the right mouse button.
- Select the Customize option on the CAD shortcut menu, which opens the Creo Commands dialog box.
- Customize the menu by adding commands, removing commands, hiding or showing rows, or changing the order of commands.
- To add commands, simply drag and drop the command from the Creo Commands dialog box.
- To remove the commands, right-click the command and select Remove or drag and drop the command outside the CAD shortcut menu
- To hide a row, clear its check box; checking the box displays the row.
- To change the order of commands, drag and drop them to the desired position.
- Click OK.
Creo also lets you customize CAD shortcut menus from the Options dialog box, as detailed here.
Vectorworks
Vectorworks supports two types of CAD shortcut menus: the document context menu and the object context menu. The former appears whenever you right-click any blank part of the drawings. This document context menu contains options that, once selected, affect the document.
The software displays the object context menu whenever you right-click any geometric object. It features options that are dependent on the type of object, e.g., whether it is a 2D or 3D object. It is worth mentioning that the two types of context menus contain some of the commands you can activate using Vectorworks keyboard shortcuts.
You can customize CAD shortcut menus in Vectorworks by following these steps:
- Click Tools, and then select Workspace > Workspace Editor from the drop-down menu. This opens the Workspace Editor dialog box.
- Select the Menus tab within the Workspace Editor dialog box.
- On the right-hand side of the dialog box, choose the type of CAD shortcut menu you wish to customize.
- From the options on the left-hand side of the dialog box, select the command you want to add to the contextual menu and drag it to the other commands listed under the shortcut menu you had selected in step 3.
- Click OK.
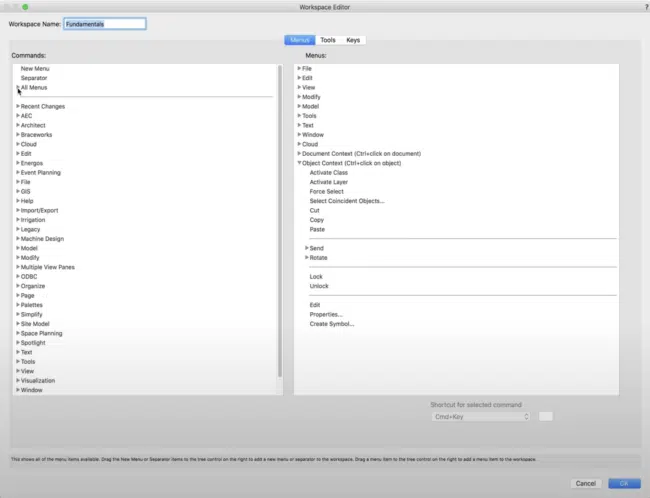
Workspace Editor in Vectorworks (source)
BricsCAD
BricsCAD supports context menus, which let you access shortcuts that may or may not be found in the BricsCAD keyboard shortcuts cheat sheet. The software also lets you customize the contents of the CAD shortcut menus. Here’s the procedure to use:
- Click Tools and select Customize to open a customization dialog box
- Select the Menus tab and click the Context menus branch in the tree on the left of the dialog box. Doing so displays all the different context menus BricsCAD supports.
- To add a new command to any of the context menus, look for that command under the Available tools tree on the right of the dialog box
- Drag and drop the command to the context menu whose options you want to edit.
- Click OK.
Best Practices for Customizing CAD Shortcut Menus
Customizing a CAD right-click menu is simple if you follow the steps outlined above. This straightforwardness can make you overlook some crucial elements that help streamline the design process even further. For this reason, this section outlines the recommended practices for customizing context menus.
- Add frequently used commands to streamline your workflow and save time.
- If you add a new command to the CAD shortcut menu, it’s advisable to add a meaningful description under the caption or description field. This description will provide information about the new command whenever you hover the cursor over it. The result? It will help other users make use of that menu item.
- Organize the commands in logical groups to ease navigation. SolidWorks lets you define and use headings to show the names of these groups.
Team-Wide Customization and Standardization
One of the toolsets in AutoCAD, Map 3D, lets you share industry model user interface settings. For context, the Map 3D toolset is included with AutoCAD; it is Autodesk’s model-based geographic information system (GIS) mapping software. Within the context of Map 3D, an industry model is a schema that contains rules, relationships, feature classes, and other settings.
With this information as the backdrop, AutoCAD lets you share the user interface configuration with other parties working with the same industry model. Administrators can export context menus as .xml files for specific user groups, such as Viewers. This feature supports team-wide customization and standardization of context menus.
Conclusion
Productivity and speed are welcome outcomes when working on a CAD project. This means that tools that enable you to quickly access commands that are otherwise hidden behind two, three, or even five clicks go a long way in spawning these results. One of the tools is the CAD shortcut menus, which display contextual commands at the click of the right mouse button. These menus offer convenience by letting you access certain shortcuts.
CAD software, including AutoCAD, Creo, SolidWorks, BricsCAD, Vectorworks, and Inventor, then boosts this convenience even further by enabling you to customize the right-click menus. As a result, you can add your frequently used commands, remove commands, change the order of menu items, create new CAD shortcut menus, and more. For its part, AutoCAD also enables you to share user interface settings such as context menus, resulting in team-wide customization and standardization. By providing quick access to shortcuts and letting you add your most frequently used commands, CAD shortcut menus boost productivity, streamline design workflows, and accelerate the design process.